Feeds:
Posts
Comments

An Instant Favorite

Front and Back of my new quilt

Things have been quiet on my blog for the last few weeks because J, Simon and I were busy packing up our lives in Ann Arbor and making the move to Boston. Leaving Ann Arbor was bittersweet for us, because while we were excited to move on to the next steps in our lives, we really, really loved living in Ann Arbor. Not only was it a great little town, we were lucky to make some amazing friends while we were there.

A closeup of the blocks

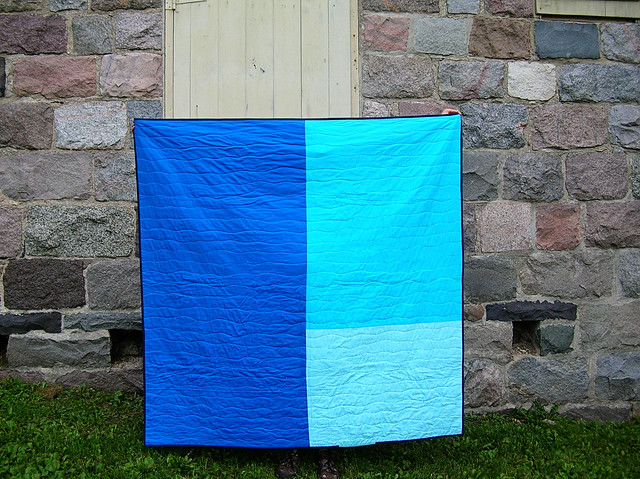
For me, leaving the Ann Arbor Modern Quilt Guild (or A2MQG) was something I dreaded. I found such a home there, both within the guild, where I was constantly and generously inspired by my fellow members, and within the individual friendships that grew out of a shared love of fabric and sewing. So you can imagine the emotion I was feeling when I was surprised with the most amazing gift just before our move– my friends had coordinated the guild to have members contribute blocks made from Denyse Schmidt’s Flea Market Fancy fabric (so generously donated by Brenda from her shop scraps– and I use the term scraps lightly, as you can see this is a formidable amount of fabric!), and put together a quilt for me to take with me on my move. I also appreciated the other fabrics that made their way into this quilt; Brenda added a bit of hope valley as she knows how much I love it. Emily added some DS quilts fabric, and Rossie and Dorie added some original Flea Market Fancy, which was such a sweet addition!

Quilt by the A2MQG

When I opened the box, I was speechless. Well, I may have actually said “are you fucking kidding me?!?!!” which was meant to convey how surprised and floored I was by this gift. It could not possibly be more perfect. And the more I learned about the quilt, the more I knew I will treasure it forever.

My new quilt made by the Ann Arbor Modern Quilt Guild

My dear friend Anna set up a flickr group to coordinate the block making, and a number of members of the guild took time to make blocks. Emily took the time to quilt it, and Anna hand finished the binding. Jenna’s contribution takes the cake– she hand stitched the label, which is our A2MQG logo. Look at those french knots on the trees! Brilliant, and so unexpected. It really completes the quilt, and puts all other quilt labels to shame.

Best Quilt Label Ever.

I want to thank the entire guild, and every person that contributed to this quilt:
Anna, Emily, Brenda, Ashley, Rossie, Dorie, Jen, Lynn, Jenna, Ronit, and Ginia
You guys are amazing, and I can’t begin to thank you enough for this amazing gift.

The back of my A2MQG quilt

I couldn’t bear to take it out of my sight as we packed up and left Ann Arbor, and it rode next to me in the car on our way to Boston. I still can’t believe it– no one has ever made me a quilt before, and I know exactly how much time and energy it takes to make such a meaningful gift. It makes the transition to a new town a little less scary, as I can see in front of me what great friends I have every time I look at my quilt. Thank you all, so, so much.

My new quilt

Ocean Quilt

I was commissioned to make this quilt last year, and although I find I say this often, this is one of my favorites!

Ocean Quilt

The design was my own, and was meant to be reminiscent of the ocean. I used prints from Denyse Schmidt’s hope valley line of fabrics paired with solids. I wanted the various sized squares to give the quilt top some movement, and I quilted it with wavy lines meant to invoke– what else?– waves!

Ocean Quilt on the rail

I kept the back simple, with just a few larger blue squares. I am glad, because it kept the back calm and complemented how busy the front was!

Ocean Quilt Back

I had to send this quilt off to its new home just as I finished it, and I have found I keep thinking about this one– I would love to make another someday!

Ocean Quilt Folded up

A time for change

seaweed on the shore

This summer marks some big changes for J and I– as I’ve mentioned here earlier in the summer, I finished my dissertation and earned my Ph.D., I turned 30, and now we’re gearing up for a big move! We spent the first bit of July traveling, and a big part of our trip was spent in Boston, which we will be calling home in a few short weeks!

Almost sunset

We took a long road trip out east to visit family and to find a place to live.
At the same time, we were helping my mom get settled into her new home, also in Massachusetts! By some crazy coincidence, my parents (who have lived in Ohio for my whole life!) are ALSO moving to MA, and will be about 45 minutes away from us!

Rhode Island

My mom had to start work in early July, and my dad will be joining her this fall. While this change is so exciting, there has been much work to be done! For my parents, preparing to move out of my childhood home is a big undertaking. And at the same time, J and I can somewhat commiserate– we’ve been living in Ann Arbor for 6 years, and we will be sad to go. However, we know that amazing opportunities lie ahead. I’m very excited to begin my work in a health psychology lab at a University just outside of Boston, and we can’t wait to explore New England!

at the shore

While we were there earlier this month we took an evening and drove down to Rhode Island, and it was so refreshing and gorgeous. Plus, after living in the midwest, it’s kind of amazing that you can drive for an hour or two and be in so many different states!

Simon

Of course, I can’t leave out the sewing (or the Simon), so I took along with me on the trip the quilt I’ve been working on– I shared the quilt top here, and I decided to hand quilt it.

Simon's helping with the quilting

Somewhat surprisingly, I am loving the hand quilting! It helps a lot that I am using batting designed to work well for this purpose (quilters dream in the request loft, 100% cotton). Thanks so much to my Ann Arbor modern quilt guild members who gave me the advice!

marking my handquilting lines

They also suggested using the clover water soluble marking pencils, which I love! I don’t think it will be too much longer until I’m done with this one, which is good– I have big plans for my next hand quilting project which I’ll share soon!

Red + Gray Squares quilt

Life has been a little busy around here, to say the least! J and I have some big changes coming up soon, and the planning has been consuming quite a bit of my time! Unfortunately I’ve fallen a bit behind on my blog reading and replying to comments here– so I do apologize for the silence, and I do appreciate everyone who has stopped by my little old blog.

Red + Gray quilt on the porch

I finished this quilt a few months back, and just realized I hadn’t shared any of the pictures! This sucker is queen sized (and was kind of a beast to quilt on my little machine, but I’m proud I managed it!). I love this style of quilt– just improvisational squares, no sashing, and a scrappy red border and binding. I could make a million more quilts this way!

Tough to hold up!

In this photo you can see it was a *little* difficult for Justin to hold it up by himself.

Red + Gray quilt block detail

(I do love those puppies from Sherbert Pips!!)

Red + Gray quilt detail

I didn’t get any pics of the back, because I just used a plain gray flannel sheet. I love how soft and warm this quilt is, it was the best to cuddle under in the winter! I’m sure we’ll get a lot of use out of it when the cold months return.

Red + Gray quilt on the bridge

Do good stitches improv chevron quilt

A few months back it was my turn to design the quilt for the Love circle of the Do. Good Stiches charity quilting bee. I love designing the quilt– I let the other women in the circle know what type of blocks I want and in what colors, and within a month they all begin rolling into my mailbox! This time I chose an improvisational chevron block (using the tutorial from Six White Horses.) I asked the members of the group to use turquoise and robin’s egg blues paired with oranges, yellows, and greys.

improv chevron quilt

I have creative license to put them together however I want, and it’s always fun to play with different layouts. Usually I would use some sashing to break up the crazy patterns in blocks such as these, but this time I thought they were playing well together and I sewed them all right up next to each other. I love how bright and busy the quilt is, and I’m really hoping it will brighten up the day of the child that receives it through the charity we donate to, wrap them in love.

improv chevron quilt back

For the back of the quilt, I pieced together a number of fabrics in coordinating colors for a bright and patchwork-y back. I just love reversible quilts! Plus, I was able to incorporate the one extra block I had from the front as the focal point.

back of the improv chevron quilt

Thanks so much to all the women in the love circle who contributed to this quilt! I couldn’t have finished this one without you!

improv chevron quilt on the porch

Stargazing

stars

I’ve wanted to make a wonky stars quilt for a while now, and the 4th of July seemed like the perfect occasion to give this a try.

Stargazing quilt in progress

I drew up a plan that involved larger interlocking stars, with a few smaller stars thrown in to give the larger stars some breathing room. I also added some of my favorite Cosmo Cricket ruler fabric into the quilt– I couldn’t resist the vintage-y feel those brought to the quilt top.

stargazing quilt seams

back of the stargazing quilt

I loved the way the back of the quilt top looked hanging on the laundry line– all those little seams for my little stars (each square finished at 4.5 inches, so you can imagine how small those little pieces were)!

small star detail

Alas, I had so many other project to wrap up this past week I didn’t get the quilt done done, but I did manage to finish up the quilt top! I’m sure I’ll quilt it soon, and we’ll have our summer holiday quilt ready for next year!

stargazing quilt top

Baby Steps Quilt

baby steps quilt

I’m so excited to share my latest finished quilt today! I’ve named this quilt baby steps, based on the teeny-tiny squares of fabric that serve as the focal point of the quilt. If you’ve been following along, you know that I was very excited when I found out I was chosen to participate in the Bloomerie scrap challenge on Rachel’s blog, Stitched in Color. I was sent a fat sixteenth pack of Summer Breeze fabrics, and I cut right into it!

Bloomerie Challenge sneak peek

I shared a sneak peek the other day, and at that point I had cut each fabric into 1.5 inch strips, and I pieced those together. Next, I turned them all horizontally and sliced them up again to create the little patchwork you can see in the finished quilt. It’s such a quick and easy way to create tiny patchwork without cutting and piecing all those little squares.

baby steps quilt

I was allowed to add an extra fabric, and I chose a light blue jewels print from Lizzy House’s recent fabric line, Hello Pilgrim. I loved how the colors blended together! I was only allowed to add one print to the mix, so I rounded out the quilt top with a white and light gray to help the colors stand out.

baby steps quilt back at the cakery

baby steps quilt back

Since I considered the quilt top to be my completed challenge, I rounded out the back with an extra block from the front to echo the design and a number of coordinating prints from my stash. I found anything in the same color family as the Bloomerie fabrics and went for a patchwork look. I love reversible quilts, and I think I like the back as much as the front!

baby steps binding detail

I decided to bind in a blue dot fabric I’ve had in my stash for a while. Since the quilt top had so many light colors, I wanted something that would frame the quilt. I ran down to a little market and cakery down the street for photos, and I was so pleasantly surprised to see how well the benches out front went with my quilt colors!

baby quilt at the cakery

Thanks so much to Rachel for hosting this challenge and selecting me to play along! And also a big thanks to Bloomerie Fabrics for sending me such a gorgeous stack of fabric to play with! It was such a great starting point for this design, and I love how you can make a little fabric stretch a long way with a creative design and good neutrals!

tee instructions from class

Last week was my birthday– I finally left my 20’s behind! The week was so much fun and it just flew by! On Tuesday, I took a class with Rae on how to make a t-shirt. I was really looking forward to this class, because you bring in your favorite t-shirt and learn how to make a pattern from it to make a new one.

Rae showing us how its done

This is the first wearable item I’ve made, and I won’t lie– it was a little scary at times! Especially when I was putting in the neckband. But everything worked out fine, and now I have a new shirt that fits perfectly!

side view of my first tee

new tee + favorite bag

The next day I headed out to the park with my mom to take some photos (thanks Mom!), and awkwardly modeled my new shirt (plus, you can catch a peek of a quilt and some new pillows I plan to blog about soon).

modeling my new tee with some of my new pillow covers

We also made time to stop at my favorite thrift shop, and I found this jadeite casserole dish to add to my jadeite collection!

jadeite casserole dish

And we stopped by Pot + Box, the studio/shop where my t-shirt class was held. They have the most beautiful displays and plants for sale, and my mom and I both ended up splurging on some new jewelry.

succlents in the toolbox

succulents

pot and box

low maintenance cacti

jewely at pot and box

air ferns
In all, it was a VERY fun week 🙂 I hope all birthday weeks turn out this well!

A sneak peek!

Cutting into my Bloomerie challenge fabrics

Ok, I’m planning a longer post about all the fun stuff I have to show for the last week, but in the meantime I thought I’d share this sneak peek at what I’m working on for the Bloomerie Challenge that Rachel is hosting.
Challenge sneak peek

Bloomerie Challenge sneak peek

Can’t wait to share the final project later this week!

Challenge Accepted!

Sometimes sewing just makes me so happy. Actually, most of the time I’m sewing (or looking at fabric, or thinking about fabric or quilts or sewing) I’m pretty darn happy. So, it’s fitting that I’m feeling pretty excited about a few new projects!

First up, I am thrilled that Rachel picked me for the Bloomerie scrap fabric challenge!

Summer Breeze Scrap Challenge!

When Rachel shared the sweet little stack of fabric above, I immediately thought it would be perfect for a baby quilt I just sketched out. I love making baby quilts– they are the perfect size, and come together so much more quickly than full sized quilts. I can’t wait to get to work on this! And I’ll try to share a sneak peek as I get things going.
As for the challenge, I can add in 1 more fabric of your choosing if I’d like to (yup, I’ll be doing that!). Each fabric has to be used, but you don’t have to use all of each one. I also am allowed to add embellishments as needed, though I tend to keep it simple with my quilts, so I’d be surprised if any buttons or ric-rack found its way into my project! I’ll wrap things up and will post about my project by July 8th, and Rachel will feature all the projects on her blog on the 9th. I am excited to see what the other challengers make– I’m sure you will all want to check it out, too!

(Also– if there are any How I Met Your Mother fans out there, you may recognize the reference in the title of my post. And if not, here’s a little video to give you some context:)

***************************************************************************************************
which way quilt fabric

I also have been chatting with some other bloggy friends, both new and old, about a quilt we’re all planning to make this summer– the pow-wow quilt (pattern by Allison from Cluck Cluck Sew). Jacey suggested on her blog that she’s going to refer to the pattern as Which Way, and I have to admit I prefer this quilt name, so I’m jumping on board and I’ll be calling it by that name, too. I pulled this stack of fabric for the quilt, and I can’t wait to start cutting it up!